Amendments
Amendment Creation
To simplify the creation of Amendments and make them more intuitive to all users, there is available a new page layout and also new functionalities to create them.
Their creation is similar to the tender creation and there are two different ways to create Amendments:
1) Through the “Amendment” widget;
2) Through the button “Extend Dates” available at the “Tender Dossier” (only available on specific scenarios).
How to create an Amendment through the “Amendments” widget?
Through the “Amendments” widget you can change the dates and/or other information of the tender. When changing the dates through the “Amendments” widget you will have available the new option “Suggest dates” (depending on the tender) and you can change the dates using this functionality or not until starting to open the replies as nowadays.
To access the “Amendments” widget go to your “Tender Dossier” and on the side bar menu click on the “Amendments” widget.
NOTE: Consult the “Work Tools” manual for more detailed information on how to manage this widget.

On the widget page, you will have available a table with the information of the Amendment(s) created by the Buyer and there you will find the button “Create amendment” enabled after publishing the tender.
If there is one amendment “in Edition” state, the button will be disabled and it will appear the following message: “Cannot create an amendment because you have 1 in Edition”. In order to enable the button, you might cancel the amendment in edition.

After clicking on the “Create amendment” button, the system will open the Amendment creation page..
How to manage the Amendment creation page?
Similarly, to the tender creation, when you access on the Amendment creation page you will have all the steps displayed on the top (the steps displayed differ according with the tender you created). Through the steps you may change the information available and then publish the amendment.

On the top of the page, you will also find the button “Back to Tender Dossier”. If you click on it, you will be redirected to your respective Tender Dossier and the Amendment created will be “in Edition” state (if it was not published yet).

At the amendments widget you will be able to manage the amendments of your tender. If you click on the “Detail” link of an amendment that was not published yet, it will open the amendment creation page.
When you are on the amendment creation page, on your left side, you will have the anchors displayed and by clicking on them you will be redirected to the corresponding fieldset as in the amendment creation

In case you desire to cancel the Amendment, click on the button “Cancel” available at the right side of the page. After clicking on it, you will be redirected to the Tender Dossier and the state of the Amendment will change to “Canceled” instead of “in Edition”.


When creating an amendment, at the right side of the page you will also have available the “Error Validator” tool that works the same way as in the tender creation.
NOTE: Consult the “Create and Publish Tender” manual for more detailed information on how to manage this tool.

In order to save the information filled/changes you made on the Amendment before publishing them, you will have available the button “Save” at right side of the page.
NOTA: When you save the changes thought this button, it will not make any error validations. Those validations are only made when publishing the Amendment.

To move from one step to another, you will have available at the bottom of the page the buttons:
- “Next”: If you click on the “Next” button, you will be redirected to the next step. On the last step of the Amendment this button will change to the button “Publish” or “Send to Approval” (in case the Amendment has workflow defined). To move through the steps, you will also have the possibility to click directly on the steps, which means you do not need to use the button “Next” to move from one to other.
- “Previous”: To move to the previous step you will have available the button “Previous”. This button will only be enabled from the second step on.

“Amendment” widget – “Publish” Step
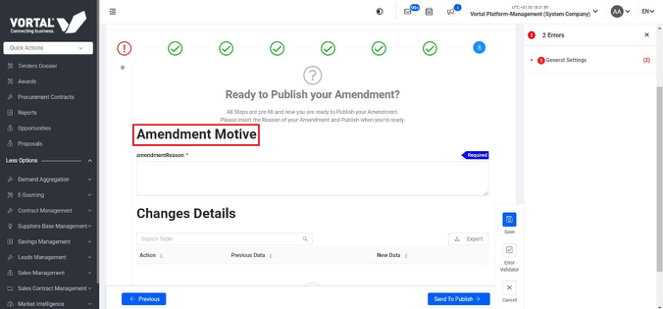
The last step you will find while you are creating an Amendment will be the “Publish” step. Here you will have displayed the “Amendment Purpose” field and the logs of the amendment.
The validations regarding the fields will be made on the buttons “Publish” or “Send to Approval” (according to if the tender has approval workflow defined on the amendment or not).
After publishing the Amendment, the “Publish” step will show the “General Data” and the logs of what was changed on the Amendment:
- Before publishing the Amendment: It will appear the “Amendment purpose” field as mandatory, the logs and also the buttons “Publish”, “Previous”, “Save”, “Cancel” and “Error Validator”;


Amendments with Workflow
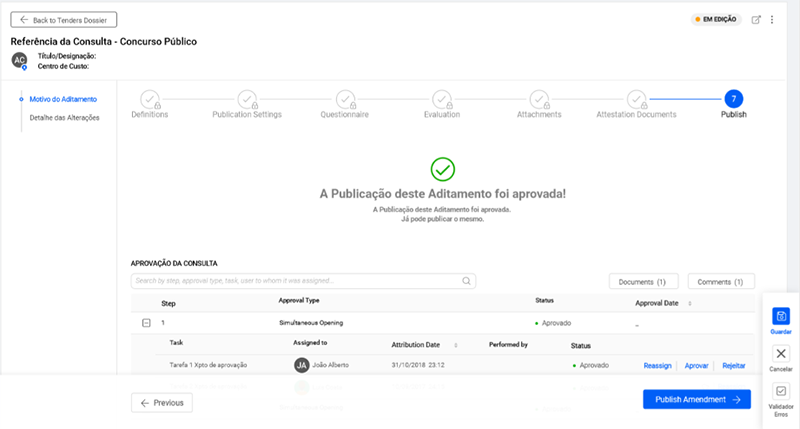
On Amendments of tenders that have workflow defined for the Amendment, on the step “Publish” (the workflow appears only on this specific step) will be available the button “Send to Approval”. This button will trigger the workflow after the workflow is finished and all users have approved the Amendment the button “Publish” will appear.
The buttons “Cancel”, “Save” and “Error Validator” will not be presented while the workflow is “ongoing”.
NOTE: The button “Send to approval” will be locked during the approval. Once one user rejects the Amendment, the button “Send to approval” will be enabled again and the information unlocked.
Below the workflow, you will also have available the button “Accept” and “Reject”.


When the Amendment is in “Under approval”, “Rejected” and/or “Accepted” states, the system will show messages on the amendment detail to inform you in which state the Amendment is:
- “Under approval” state: When the amendment is under approval it will be shown a message stating your Amendment is under approval and the publication requires approval of users;
- “Rejected” state: When the workflow is rejected the system will show a message until it is sent to approval again stating the Amendment was rejected;
- “Accepted” state: When the workflow is accepted the system will show a message stating the document was approved.
Amendments without Workflow
On Amendments of tenders that do not have workflow defined for the Amendment, on the step “Publish” will be available the button “Publish” which will publish the Amendment (without having to send the amendment for approval and then publishing it).

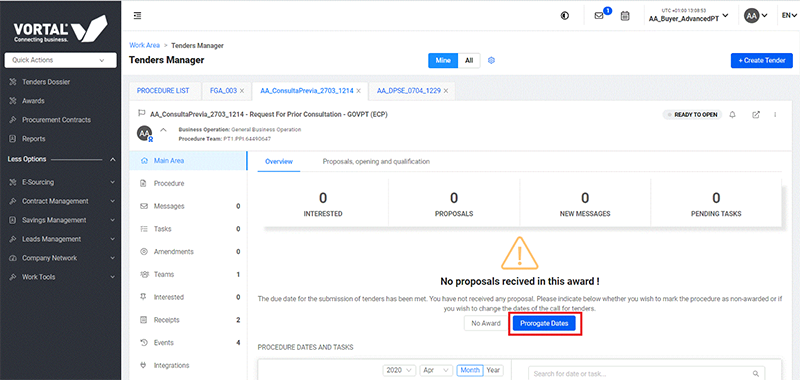
How to create an Amendment through “Extend Dates” button?
The button “Extend Dates” will be available for the Buyer on some specific states and he will be able to extend the dates of the tender without having to make an amendment through the widget.
Through the button “Extend Dates” you can only change the dates in the tender, and the “Suggest dates” option is not enabled.
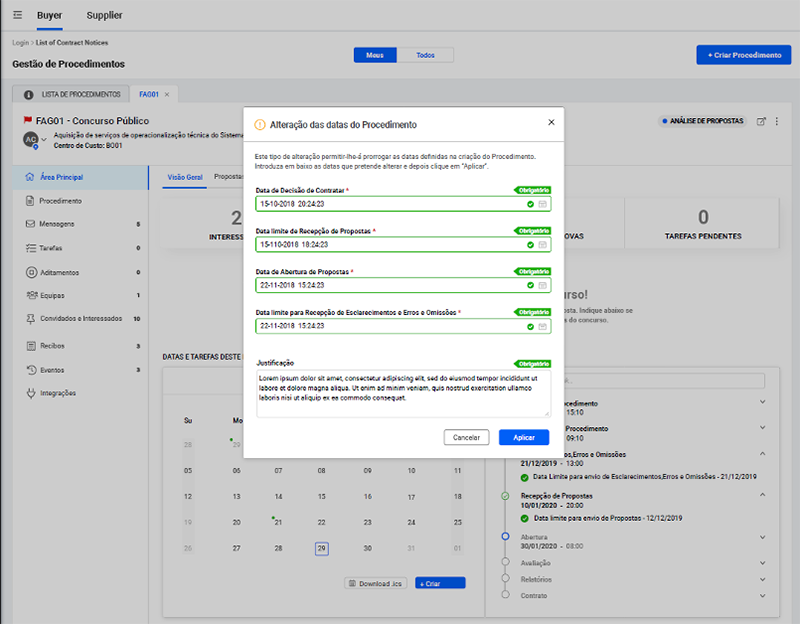
When clicking on the button “Extend Dates” it will appear a modal where you will be able to choose other dates and justify them. The amendment purpose is mandatory and if you do not insert any justification the system will show an error message.
When using this option, the workflow will not be triggered.
By clicking on the button “Confirm” of the modal, the system will send an “Amendment” email for the suppliers.
Which types of Amendments there are?
There are two types of Amendments:
1)“Dates” type: If you only made a change on the schedule (even if the amendment was made through the Amendments widget) the type of Amendment will be “Dates”. If the Amendment was made through the “Extend Dates” button it will also be classified as “Dates” type. These two types can be identified on the widget on the column “Type” and the user can easily see if there was only a change on the schedule or if there were more changes (in case the type is not “Dates”).

2) “General” type: If you made a change on any other fields that are not dates, the type of the amendment will be classified as “General”.
If you change dates and other information, the type of the amendment will be “General”. The “Dates” type is exclusive for occasions were the only change was on the dates.
NOTE: On the GovES tenders, it will be shown on the modal a button where you can choose to communicate to PLASCP or not. By default, this button will have selected the same option that was filled on the tender.
