Reply Creation and Submission
Reply creation
There will be a new reply creation and submission page with changes on the organization and presentation. To be more intuitive to all users it will have a new page layout and also some new functionalities.
The steps presented throughout the proposal creation, will display several states and colors along the way. Each of the following steps will be displayed on the top of the page:
- General Information;
- Questionnaire;
- Documents;
- Finish and Send Reply.
Reply creation layout
As you enter on the reply creation page, you will have available a new layout and also some new functionalities.
The header of the reply creation page will always be visible through the page with the following information available on the left (“Back to Opportunity Dossier” button (Supplier Side) or “Back to Buyer Dossier” button (Buyer Side, when its external proposals), Reply Reference, Buyer Name, Tender Type, Request Reference and also the Request Title) and right sides:


On the right side of the header, Suppliers will have a countdown displayed for them to see more detailed information, and the deadline for submitting bids is presented above. This countdown will be available for all offers.

To access more quickly to a specific fieldset, users can use the anchors located on the left side of the page. The anchoring panel allows the user to select one of the fieldset and when selecting he is automatically redirected to the placement of that fieldset on the page.
NOTE: The user will be able to hide or unhide the anchors' through an arrow.


In the lower right corner of the screen you will have available the following buttons along the reply creation process:
“Save” button
In the bar displayed in the lower right corner, there is also the “Save” button. By clicking on this button will be possible to save the proposal at any time even if you have not filled all mandatory fields, because all validations will be made through the last step to publish the proposal.

When creating the proposal, the errors will be shown in the “Error Validator” tool.
The user will be able to validate the errors while creating the proposal by clicking on “Error Validator” tool available on the right side of the screen. In case the user goes to the last step and there are fields/questions/documents missing, the validator drawer will open automatically.

“More Options” button - “Duplicate” option
To duplicate the proposal to submit a variant proposal, users will have to click on the “More Options” button displayed in the lower right corner. By clicking on it appears the duplicate and delete actions. When you click the “Duplicate” option, the new proposal will be created with the same data filled in the previous proposal and the user will be automatically forwarded to that page in the editing view.
If the user clicks on the “Duplicate” option, a confirmation modal will be opened asking if you wish to save the current proposal or to discard the changes.

“More Options” button - “Delete” option
Similar to the previous option (“Duplicate”), the “Delete” option is also located inside the “More Options” button.
After deleting the proposal, users will be forwarded to the page of the corresponding opportunity dossier and appears a message stating that “The proposal has been deleted successfully.”

“Previous” and “Proceed” buttons
There are two buttons in a bar located at the bottom of the page. The “Previous” button allows users to navigate to the previous step. This action is only available when there is at least one previous step that is not locked.
When there are previous steps and is not possible to go backward or when the user is in the first step (General Information), the button will be visible, however, it will be disabled.
In case you wish to go to the next step(s) and/or navigate between steps through the steps, you can click on the “Proceed” button.

“Create External Proposal” button
The “Proceed” button is different on this first step. For the buyer to be able to unlock and advance officially for the next steps, he will have to click on “Create External Proposal”, and for this, it is necessary to define at least the supplier and the reference of the proposal. Once the proposal has been created with the supplier and the reference, the next steps are unlocked and this button will only serve to proceed.

Creation / edition of proposals for negotiation rounds
The creation / edition of proposals for negotiation rounds will be similar to the creation of proposals in the first phase. The big differences are the title and description fields that are automatically filled in according to what is defined for each procedure.
Also, when it comes to negotiating a procedure with lots, the lot table will be visible, however, the supplier will only be able to view it. Therefore, the lots table cannot be changed by the supplier and will only show the supplier which lots are defined to negotiate.
Amendments
To easily edit proposals in edition will be possible to see when an amendment was applied:


When there are changes to a procedure that requires corrections to the proposals and that suppliers have already proposals in edition, an alert message will appear stating these changes.
Below the alert message of the amendment, there is a button to see details. Clicking on “view detail” will open a drawer that displays all the details.
The button to apply changes on my proposal based on the amendment will be available below the alert message, and when the user clicks to apply changes, all the fields that had changes will be updated.
When the proposal is invalid due to an amendment that was published after sent the reply, will be displayed an alert with a message.

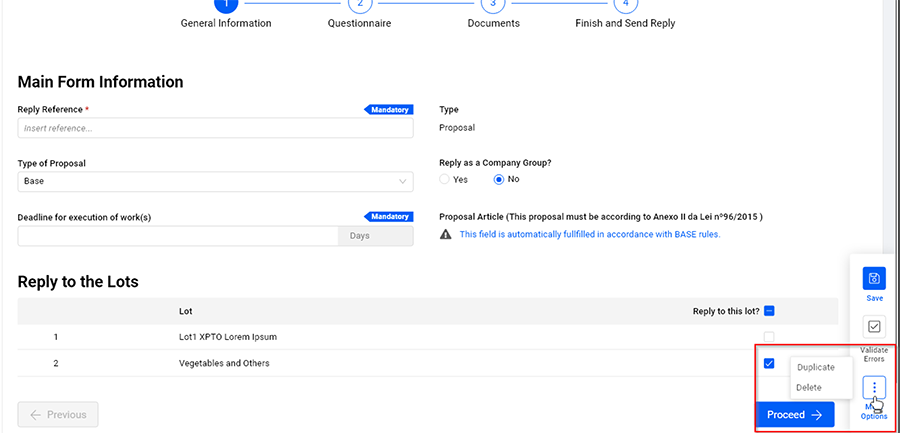
1. “General Information” Step
This step will present all the information that is already displayed nowadays but will be added the details to define which lots suppliers intend to reply (when applicable) for the process to be quicker.
To define the lots to be applied it is needed to (un)select the column “Reply to this lot” and by default, all lots will be selected. When there are lots in which the supplier has not been invited or is unable to reply, the checkbox will be disabled and an alert icon appear to show a tooltip on mouseover (see figures below).
When there are lots and the Supplier does not select at least one lot to reply he will not be able to proceed to the next steps. An alert message will appear warning that it is mandatory to select at least one lot to reply to proceed with this proposal.


In case we are replying to a procedure with Main Form (GovPT), when there is a question regarding the deadline for the execution of work(s), this field will be shown at the end of the fieldset “Main Form Information” and will be added the following two fields:
- The time needed to execute works (Days): Will only be visible when applicable
- Proposal Article (this proposal must be according to Anexo II da Lei nº96/2015): An alert saying that the main form will be generated automatically.
On the other hand, the info regarding the proposal article for BASE will be displayed after the field for the deadline, when it is applicable.

1.1. “Company group members” fieldset
The table for companies group members will have the same info but with some changes in their functionalities:
- By default, my own company will be set as a leader;
- To set another company as a leader click on the option that is displayed on the right side (Set as leader);
- Companies that are not leaders will always have a link to set as a leader;
- The companies that we can be deleted (all companies added except my own company) from the table will have an inline icon on the right side to delete.
- If the user fills in the percentages of the companies and the total exceeds 100%, in total an error icon will appear, and on the error validator will appear a message warning the total of representation of the companies exceeds 100%. When the total of representation is equal to 0%, this validation/alert will also appear.
- The last column will show the total value corresponding to the percentage of each company and the corresponding value of the proposal.
- By deleting a company that is a leader, my own company will pass as a leader of the proposal.
To add companies to reply as a company group you have to click on “+ Add Company” and then, will be opened a modal to search and select companies.
NOTE: If the user does not find the company that he wants to add, he also has available a button to register a new company that will open a drawer to register.


2. “Questionnaire” Step
The questionnaire will have a new and improved layout and form structure when creating the proposal that will help users to read and understand the data that is presented in it (sections and sub-sections).

The envelopes and their questions will be divided into steps , to simplify the way how reply to an opportunity.


Inside of the questionnaire step, there are anchors displayed according to sections and questions available. Thus, these anchors have a sub-level for all the questions, because they are inside of sections.

2.1. Add Comments
When creating a reply, the user will be able to insert comments and also attachments in the pricelist. To add a comment or a file, they need to click on the 3 dots available for each item in the pricelist.
When they add a comment will be displayed a text for the comment and also a “bin” icon to delete the comment below the article.
When a user clicks on create comment but leaves this field empty the comment disappears.
The files attached by the supplier will be displayed below the comments and he will also be able to download (only when there is no encryption of the files automatically) or delete the file.
In the pricelist, the user can see other comments and documents provided by the buyer, however, he cannot delete or change this information. He will only be able to see the information or download the files attached by the contracting authority.
2.2. Attach Files
Suppliers can attach files in the questionnaire step in line with the respective question, to simplify the process of adding documents.
So, when a specific question in the questionnaire requires evidence will be displayed below a field to upload that evidence. After uploading/importing the evidence, this document or file will be also available in the documents of the proposal.
NOTE: It will be also possible to drag and drop a file into the questions or documents, inside of a specific area.
When there is an attachment question it will be possible to upload the file(s) directly on the questionnaire step. These documents will also be available on the documents of the proposal and allow also to drag and drop the files from your computer.
2.3. “Export” and “Import” pricelist buttons
For each pricelist presented in the questionnaire, there will be available two buttons that allow the users to export and import the pricelist. The file format to export will be according to the configurations set in company settings.
3. “Documents” Step
The option to sign proposal documents will be available inside of this step and will allow you to sign documents attached in the questionnaire of the documents step.
To use this option, the user must select the documents that he wants to sign and click on “Sign”. By clicking on this option, will be open the modal to sign the documents.
When a procedure has the following parameter to encrypt documents: “EncryptUploadedFiles = true”, all the documents uploaded will be encrypted automatically and they cannot see/download them until the opening of proposals. Encrypted documents (automatically or by an action made by the user) will have a lock icon that when selected displays a modal.


3.1. Add from Company Docs
In the step for documents will be available in the 3 dots icon an option to “Add from Company Docs”, but only when the document has not been added yet. Clicking on this option a modal will be opened with the company documents so that users can choose documents to add.

3.2. Save the document to company docs
In the lines of documents that are not yet saved as entity documents, there will be inside of 3 dots an option to add that document to company documents. By clicking on this option will open a modal to define the classification and the description of the document.


3.3. Attestation Documents
As a Supplier or Buyer, when the procedure has defined that is required attestations documents in the proposal phase, they will be available in the table for other attachments on the documents step.

3.4. Procedures with one envelope
To be easier to check the documents attached by the supplier or requested by the buyer this step will have some changes.
When a procedure to which we are answering does not present envelopes (only one economic envelope), this step will have the following details:
- There is only one fieldset for the proposal documents;
- For all documents requested/attached to the questionnaire and attestation documents we will have one table visible only if at least one of the conditions below are true:
- Evidence is requested; and/or
- There are questions of the attachment type or attachment with template;
- Requirements that request annexes;
- The supplier attached other documents to in questions even if unsolicited (example – add an attachment to a pricelist item)
- Was required attestation documents in proposal phase (example of Concurso Público – GOVPT)
- Proposal Documents (PDFs) and coversheets, after finishing the reply.
- There is an area for other Documents, inside of each envelope;
- Users should be able to drag and drop documents in each area of documents to upload.


3.5. Procedures With envelopes (two or more)
When a procedure has two or more envelopes will be displayed a table for each envelope. These tables will be visible only if there are required documents or documents attached by the user in the questions.
Each envelope will have also an area to upload other documents and to add comments and when the supplier attaches documents will be displayed the table with that documents.


4. “Finish and Send Reply” Step
When the user goes to the last step to “Finish and Send Reply”, either by clicking on the step or from the button to proceed, the platform will validate all errors, as if he clicks on the option “Validate Errors”.
While the application validates these errors, which may be a somewhat time-consuming process, all the fields and buttons of the proposal will be disabled and a loading icon appears with the following message: “We are validating whether the proposal data is correct. Thank you.”

So, when the proposal does not have any errors it will be available the “Finish & Sign Proposal” button or just to finish the proposal. By clicking on the button to finish and when applicable, it will be opened the signature modal so that the user can sign the documents that are generated by the platform and the documents he has uploaded. When a proposal is approved, this information should no longer be available.

4.1 Signing a proposal
If you click on “Sign Later” in the signature modal or leave the signature modal, the proposal will be finalized/approved, however, will be displayed a message only to sign the proposal. In case it is necessary to change some information, users will need to click on the “Edit” option available on the fixed panel on the right.
When a proposal has been finalized but the supplier did not sign the proposal, the reply will display in all steps the widget with a message to sign the proposal.

4.2. Proposal signed and ready to encrypt and submit
After completing the proposal and signing all the documents, all steps of the proposal creation will display a widget with a message: “Proposal not encrypted and not submitted!” or “Proposal not submitted!” when there is no encryption. When the proposal is finalized or finalized and signed, this widget state will be displayed in all steps of the proposal creation.
To encrypt and submit the proposal you should click on the blue button displayed in the lower right corner and a submission modal will be opened.

Buyer side – Counter proposal
When the buyer intends to create a counter proposal to the supplier, the buyer will access the counter proposal creation page.
The data of this page will be similar to the supplier. The only differences for a counter proposal are in the first step, in which will be presented the data of proposal (Reply Reference, Type and Created By), a text area to place the notes of the proposal, the proceed button becomes “Start Counter Proposal” and the other steps locked.

Only after the buyer clicks “Start Counter Proposal” is that the proposal is created as a draft (In Edition), the next steps are unlocked and he will be automatically forwarded to step 2.
Buyer side – External proposal
The creation of external proposals will have the same fields and the same behavior on the creation of reply by suppliers, however, there are two major differences:
- Only the first step is enabled until the buyer completes all the mandatory fields and clicks on “Create External Proposal”;
- In the first step will be available a fieldset where the buyer can select/register the supplier who belongs the proposal.

1.1. Identification of the supplier for external proposal
To enter the supplier of the external proposal, the buyer must add the supplier or register a new one in the “Supplier” fieldset.
If the user clicks on the “+ Select Supplier” button, will be open a modal to search and select the supplier or to register a new one.

To create a new supplier for the proposal, because the Buyer did not find the supplier registered, it is needed to click on “Register New” in the modal and will be open a drawer to fill the profile of that company. After creating it on the drawer, the supplier will be automatically added to the proposal.

1.2. Change the supplier
The buyer can remove or change the supplier of the proposal by clicking on the “Change supplier” button that will open the modal to search and select another supplier. After changing the supplier, the previous one will be removed.

Validate errors
After the full validation, if there are errors in the proposal the application will automatically open the error panel and the steps where there are errors change to the error status. It will not be possible to finalize the proposal if there are/is any error(s).

If the proposal does not have any errors after error validation, it will be possible to finalize the proposal.

For procedures that do not need to be signed, the button will be “Finish Proposal” instead of “Finish & Sign Proposal”.

After the proposal submission
After the submission of the proposal to the buyer, the supplier will be redirected to the page view proposal and will be displayed a success message indicating that the proposal was submitted with success.
Once the proposal is submitted, the buttons will be available to view the receipt and to print the proposal. By clicking on the receipt icon will open the drawer with the detail of the submission receipt.

1.1. View proposals after submission
When a proposal has been submitted and the suppliers’ access to them through the opportunity dossier, they will see the new layout for the proposal.
This page is very similar to the page for reply creation, however, all the information will be displayed on a unique page without steps. Suppliers will have also available the anchors to navigate easier between the information.
On the panel of actions, they will have an option to duplicate the proposal when it is possible (when a proposal is not encrypted).


