Create Tenders
Only new procedures will be available in the VISION layout. All procedures that have already been started on the NEXT platform will be finished on it, without any impact. Nonetheless, you will be able to check all tenders in the Tender Manager, regardless of the platform where they were initiated.
How to Create a Tender?
As you enter on the Tender Creation page, you will have available a new layout and also some new functionalities available when creating a tender.
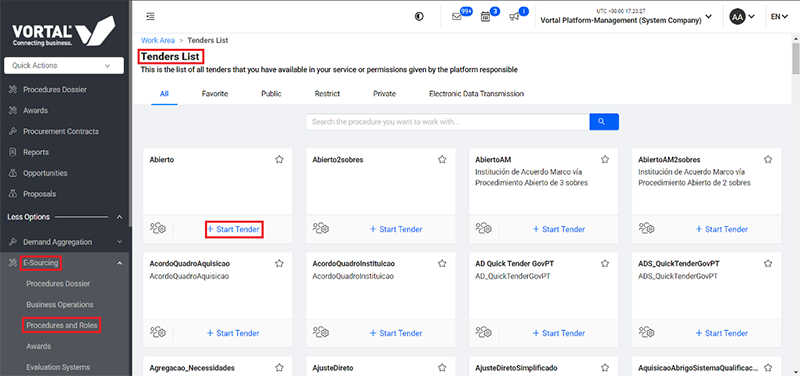
There are 3 different ways for you to access the “Tender Creation” page:
1) “Dashboard” view > Click on “+ Create Tender” button > Redirects to “Tender list” view > Choose the tender you want to create > Click on “+ Start Tender” in order to start creating the tender.


2) Click “Tenders Dossier” on the side bar menu > Redirects to “Tenders Manager” view > Click “+ Create Tender” button > Redirects to “Tender List” view > Click on “+ Start Tender” in order to start creating the tender.

3) Click “E-sourcing” on the side bar menu > Click on the option “Tenders and Roles” > Redirects to “Tender List” view > Click “+ Start Tender” in order to start creating the tender.
Tender Creation
The tender creation process consists in filling different fields in each step. However, the number and order of the steps may differ according with the tender you choose to create.
Each step of each tender is displayed on the top of the page:
1) General Settings;
2) Publication Settings;
3) Questionnaire;
4) Evaluation;
5) Documents;
6) Attestation Documents;
7) Invitation;
8) Publish.

NOTA: As an example, on how the steps available can differ, the “Quick Tender” offer only have the steps “General Settings” and “Publish”.

Each step can have several fieldsets. At the left side of the screen each fieldset title is displayed as an “anchor” where you can click in order to go directly.
These “anchors” will follow when moving along the page.

“General Settings” Step
There are fields that are mandatory to be filled and others are optional, according with the options that are available on each tender (mandatory fields are clearly marked).
Below is presented a list of the possible fieldsets you can find in the tender creation process (these sections depend on the tender type):
- “National Announcement”;
- “Establish Dynamic Purchasing System Announcement”;
- “General Info”;
- “Categories”: After you insert the title and description of the tender, when selecting the CPV you will have 5 categories suggested by the system according to what was previously written in the other field.

- “Location”;
- “External References”;
- “Identification”;
- “Publication Schedule”;
- “Framework Agreement”;
- “Scheduling”: While creating a tender, you will have to select the “Time Zone” (mandatory field) and you can define the exact dates through a calendar.

- “Financial Settings – Warranties”;
- “Central Purchasing Bodies”;
- “Delivery Location”;
- “Financial Information”;
- “Visits to the place of works”;
- “Price Boundaries”;
- “Threshold and Product Neutral Settings”;
- “Abnormal Low Offers”;
- “Negotiation and Auction”;
- “Bidding Rules”;
- “Advanced Settings”: When you select “Yes” the field “Decimal Places Configuration” will appear and you will be able to define “Number of intermedium decimal places” and also the “Number of total decimal places” (optional field). The system will limit the number of decimal places you can insert;
- Decimal Places Configuration;

- Bidding Rules.
You only will be able to go to the next step, when:
- After all the mandatory fields are correctly filled and no errors were found by the system inside the fieldsets “General Info” and “Team”, the “Unlock” button will be enabled and turn blue colored;
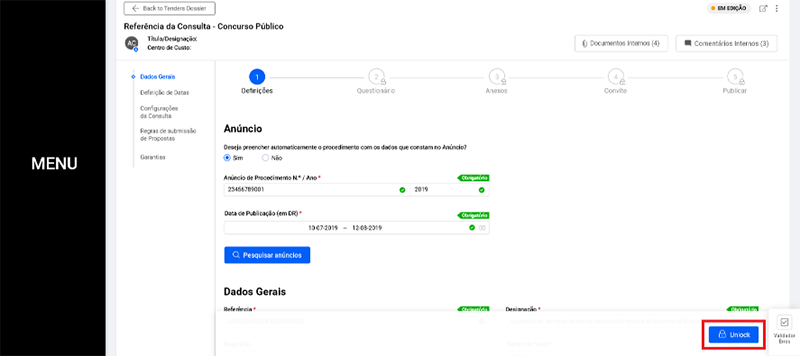
- If the Tender Dossier has Approval Workflow, the button will be named “Send to Approval” and when you click on the button the workflow with be triggered and the information unlocked.
IMPORTANT NOTE: In case you go back to the “Tender Manager” with the other steps locked, the “Buyer Dossier” will not be created and the information will be lost.
- After the “Unlock” button is enabled, you will be able to go the next step by clicking on the button “Next” (you can also click in each step to move across them).
NOTE: The “Next” button is not available at the last step of the tender and it is replaced by the button “Publish” or “Send to Approval” (in case there is a workflow to approve the publish of the tender).
How to add an Internal Comment and/or an Internal Document?
Along the creation of the tender, but only available when all steps are unlocked, you will be able to add an “Internal Comment” and/or an “Internal Document” if you want to, by clicking on the “Internal Comments” and/or button “Internal Document” buttons displayed at the header of the page.
Botton “Internal Documents”
By clicking on the button “Internal Documents” a side drawer will open and you will be able to add, remove and also edit documents. The button itself have a counter with the total number of documents added.
NOTE: When there are no documents, the counter will not be shown.


Botton “Internal Comments”
If you click on the button “Internal Comments” a side drawer will open and you will be able to add/remove and edit the comments, and there will be a counter with the total number of comments added.
NOTE: In case there is no comments added, the counter will not be not shown.


"Publication Settings” Step
Similarly, to the previous step, “Publication Settings” step also have mandatory and optional fields (the majority are optional).

Above is a list of the possible fieldsets you can find along the creation process:
- “Notice Preview”;
- “Tender Admission Criteria”;
- “Tender Responsible”;
- “Object of Contract”;
- “Legal, economic, financial and technical information”;
- “Administrative and revision information”;
- “Preliminary Consultation”;
- “Previous Approval”;
- “Environmental Criteria”;
NOTE: From the second step you will have available the Button “Previous”. When clicking you will go to the previous step.

"Questionnaire” Step
In this step there is only one fieldset called “Questionnaire” with several optional fields.

How to add Sections on a Questionnaire?
1) Click on the 3 dots at the corner of the questionnaire, and then select the option “Add Section”;
2) A section will be created at the bottom of the questionnaire and you can edit the name in line

How to add a Section for a tender with no lots?
1) When there are no lots defined it will appear by default a section named “Section 1” (the name is editable) with a price list question.

How to add a Section for a tender with Lots?
1) In this step, by default when you access to the questionnaire the fieldset “Define Lots” is set as “No” (according to each tender);
2) If you select “Yes” the system will automatically open a new lots drawer where you will be able to define the detail of the lots. On the side bar (below the option “Add question”) you will also have available the button “lots”;

3) The section created by default has a price list question for each lot. You can export several price lists at the same time, by clicking on the “Export” button at the top of the questionnaire that will export all price lists questions;
4) When adding a section on the questionnaire, the section will be applied to all lots and you will not be able to add only into specific lots. You can add a section inside other sections (Sub-Sections), but you cannot create sections inside a lot;
5) You also have the option to import lots through the excel (“Export to Excel” button”), using only one sheet of the excel file.

How to create lots?
1) You have a field where you can insert a number of lots to be created automatically on the questionnaire (maximum 5 lots to be created automatically each time). When clicking on the button “Add” the lots will be created on the questionnaire.

How to remove a Lot?
1) Click on the button “Trash can”;
2) The section associated to that lot is changed to a section called “All lots”.
NOTE: In case you delete a lot, you will be able to choose if you want to move the questions associated to that lot to another lot/section.
How to add Question on a Questionnaire?
1) Click on the Button “Add Question” available ate the side bar;
2) When clicking on the button, you will have to choose the question type and then the location (lot or section) where the question must be added. Here are the types of question you can choose:
- Multiple Choice Question;
- Matrix Choice Question;
- Number Question;
- Attachment Question;
- Logical Question;
- Requirements Question;
- Price List Question;
- Single attachment with template Question.
3) Between all the question types offered, you will have to choose the lot or section where the question will be added or drag and drop the question to an existent section/lot.
NOTE: To simplify, you can also search for the sections/lots by the name of the lot or section using the search engine available.

How to add Question on a tender with envelops?
1) While adding a question to the administrative, technical or economic envelope, you will have to choose the lot or section in which the question must be added or you can add the question to a new section created through the button “Add New Section” which will create a section (all lots) with the type of question selected.
2) The questions are added inside each envelope.
How to change a question from one lot to another (only on a tender with lots)?
1) Click on the 3 dots icon available in each question and then select the option “Change lot”. Here, you can choose the lot to where the question must be changed to.
How to move questions?
1) Click on the “bin” icon;
2) After clicking, the system will show a new modal where you will be able to choose if you want to move the questions of that lot (price list and other associated) to another lot or maintain them as a section (all lots).
NOTE: In case you do not select any lot at the drop, the system will show the following alert message: “There are questions associated to this lot. Do you want to keep the questions in a section or assign them to a specific lot?”.

How to create/select Questionnaire templates?
1) Click on the button “Template” displayed at the top of the questionnaire;
2) After clicking, it will show a list of templates available for that tender type. When selecting one, the sections that are available at the questionnaire will appear and then you can add the template to a section;
3) To drag and drop the template to a section, you have to click on the template and drag it to the section;
4) When clicking on the option “Save Template” a modal will be shown, and then you can write the template name and the sharing option.
NOTES:
- To simplify, you have available a search engine to search by the template name.

Evaluation” Step
In this step, you may find different fieldsets all with optional fields. As the other previous steps, at the right side of the screen, there are anchors that when clicked, you go directly on each one of them:
- General Settings;
- Evaluation Items;
- Rules for selected evaluation item: '{xxx}'.

"Attachments” Steps
In this step, you will also find fieldsets all with optional fields. At the right side of the screen are the “anchors” that when clicked, you go directly on each of the following fieldsets:
- External Comments;
- Documents.

"Attestation Documents” Step
In this step, you are able to select the list of documents that you can request so that the supplier can provide them in the proposal or even in the award.

"Invitation” Step
In this step, you may find the following fieldsets:
- Invitation Scope;
- Comments for Suppliers (only available for "Buyer Notes Invitation" offer).
NOTES:
- For “eAuction as a Procedure” and all the tenders with the same rules you can add additional contacts on each supplier. They will be notified thought an invitation e-mail in their company notification e-mail.
- In advanced offers, you are able to insert other e-mail on the invitation by inserting the e-mail address in a link;
- For GovPT and GovES markets, when you invite a supplier to a tender, you will be alerted through an icon on that the supplier has already reached the awarded value threshold.

"Publish” Step
On this last step available before you publish the tender, it will be shown two different buttons according to if the tender has workflow or not, and also a message that indicates if the tender is ready to be published.
The button “Publish Tender” will only be enabled if there are no errors on the previous steps, and when that happens you will be able to successfully publish the request and will appear a success message
How to publish a tender with Approval Workflow?
If the request has approval workflow you have to:
- Click on the button “Send to Approval” which will trigger the workflow and lock all the information during the approval (This button will only be enabled if there are no errors on the previous steps);
- Once the workflow is triggered it will appear on the top of the last step with the buttons “Accept” and “Reject” available to the users that are part of the workflow. If the workflow is rejected the drawer to insert a comment will appear.
- After the workflow is approved the user will have available the button “Publish Tender” and will also have the option to go back through the button “Edit”.
How to publish a tender without Approval Workflow?
When there is no workflow defined for the request the button available at the last step will be “Publish Tender” that only be enable when there are no errors in the tender.

Dates Validation when publishing the tender
When you are publishing the tender, the system will display a dates modal where the exact dates defined on the tender will be shown in a calendar format (you are able to change the dates defined on this modal if you wish).
NOTE: This modal only appears when the tender is ready to be published and without errors.

How to validate errors?
When you are creating a tender, there is a new “Error Validator” tool available in all the tender steps.
To validate the errors while creating, you just have to:
- Click on the “Error Validator” button available at the right side of the screen.

NOTE: All error validations will be made once you access to the step “Publish” by clicking on the step or clicking on the button “Next” to go to the step “Publish”. The system will automatically validate all errors when you process to the last step of the request (Step “Publish”).
Steps with error(s) detected
In case there is any error, the error validator will appear and you will not be able to publish or send the tender to approval without correcting the errors once the buttons “Publish”/ “Send to Approval” will not be enabled.
The steps with errors will be will be presented in red and with an icon and when you click on the error, you will be redirected to the respective field.

Information/actions available on the “Error Validator”
- Total number of errors;
- Steps in which the error occurred (you are able to extend or collapse each step), and number of errors in each step;
- “Refresh” Button: When clicking the system will make a refresh and update the errors;
- “Arrow” icon: Closes the drawer.
Steps without error(s) detected
If there are no errors and you click on the button, on the drawer will appear a message in green “No errors found!”.
The steps that do not have any error will be shown in green with an icon.
What will happen after publishing the tender?
- After publishing the tender, the steps disappear and you will see the request view;
- The buttons “Internal Documents” and “Internal Comments” will be available to add comments or documents at any time during the tender process;
- On the left side of the page will be shown the steps as main anchors and the fieldsets as anchors inside the main ones;
- All the information about of your tender will be available in the “Main Area” widget so that you can have all the information that you need;
- All the widgets and tabs will be available in the Tender Dossier.